What Test Instruments Are Required To Troubleshoot Electric Water Heaters?
You’ve got an electric water heater that’s not doing its job. Maybe it’s not heating at all, or perhaps it’s just not as hot as it used to be. It’s a frustrating problem, especially when you’re counting on that hot water for your morning shower or washing dishes. You want to figure out what’s wrong without calling in a pro right away. That’s smart! Knowing the right tools can make all the difference.
The primary test instruments required to troubleshoot electric water heaters are multimeters, clamp meters, and non-contact voltage testers. These tools help diagnose issues with heating elements, thermostats, and wiring by measuring voltage, current, and resistance accurately.
Understanding the Core of Electric Water Heater Troubleshooting
An electric water heater works with a few key parts. Two heating elements, one at the top and one at the bottom, heat the water. Thermostats control these elements, telling them when to turn on and off. A high-limit switch acts as a safety device. Understanding how these parts work together is key. When one part fails, the whole system can stop working right.
This can leave you with cold water. Or, it might mean your water isn’t getting hot enough. Sometimes, you might hear strange noises. These are all signs that something needs attention. The goal is to pinpoint which component is causing the trouble. This is where your testing tools come in. They help you check if electricity is flowing where it should. They also check if the parts are working as they are designed to.
My Own Cold Shower Scare
I remember one chilly Tuesday morning. I turned on the shower, expecting warmth, but only got an icy blast. Panic set in. It was early, and I had a full day ahead. My mind raced through possible causes: a broken pipe? A power outage? I checked other lights and appliances; everything else had power. So, it had to be the water heater itself. I’d dealt with minor plumbing issues before, but electrical troubleshooting felt a bit more daunting.
I’d seen videos of people fixing water heaters. They often used what looked like complicated gadgets. I didn’t want to just start taking things apart without a plan. I needed to know what tools would give me the right answers. It felt like staring at a puzzle with missing pieces. The thought of making the problem worse by guessing was a real worry. But the need for hot water pushed me to learn. I knew I could tackle this if I had the right guidance and the right instruments.
Essential Testing Instruments Explained
To safely and effectively troubleshoot an electric water heater, you’ll need a few specific tools. These aren’t just for professional plumbers or electricians. They are accessible and essential for any homeowner who wants to tackle these common issues. Each tool has a specific job. Using them correctly will help you diagnose problems quickly and safely.
The Mighty Multimeter
A multimeter is your most important tool. It’s like a Swiss Army knife for electrical testing. You can use it to measure three key things: voltage, resistance, and continuity.
Voltage tells you if power is reaching a component. Resistance measurements help you check if a heating element or thermostat is still good. Continuity testing is similar; it confirms if an electrical path is complete.
Make sure your multimeter has a good range for AC (alternating current) voltage. This is what comes from your home’s outlets. Also, check it can measure ohms (for resistance) and has a continuity setting that beeps.
The Clamp Meter: Measuring Current Without Cutting Wires
A clamp meter is another very useful tool. It’s especially handy for measuring electrical current (amperage). The great thing about a clamp meter is you don’t have to disconnect wires to measure current. You simply open the clamp around a wire, and it gives you a reading.
This is great for checking if the heating elements are drawing the correct amount of power. If an element is failing, it might draw less current than it should. Or, if there’s a short, it might draw too much.
Using a clamp meter is also safer than other methods for checking current. It reduces the risk of touching live wires. It gives you a quick snapshot of how much electricity is flowing through a specific circuit.
The Non-Contact Voltage Tester: A First Line of Defense
Before you even touch anything, a non-contact voltage tester is a must-have. It’s a simple pen-like device. You hold it near a wire or outlet. If it detects voltage, it lights up or beeps.
This tool is critical for safety. It helps you quickly confirm if a circuit is live or dead. You should always use this first to make sure the power is off before you start opening panels or touching components.
It’s not as precise as a multimeter for detailed readings. But for a quick safety check, it’s invaluable. It gives you peace of mind knowing whether you’re working with live electricity or not.
Understanding Electrical Readings
Voltage (V): This is the electrical “pressure.” Your water heater uses a specific voltage, usually 240V in the U.S.
Current (A): This is the “flow” of electricity. Heating elements use a significant amount of current.
Resistance (Ω): This is how much a component “fights” the flow of electricity. Good heating elements have a specific, low resistance. Bad ones might have very high resistance or none at all.
When Things Go Wrong: Common Scenarios and Tools in Action
Let’s walk through some typical electric water heater problems. We’ll see how these tools help us figure out what’s happening.
Scenario 1: No Hot Water at All
This is the most common issue. The water is completely cold.
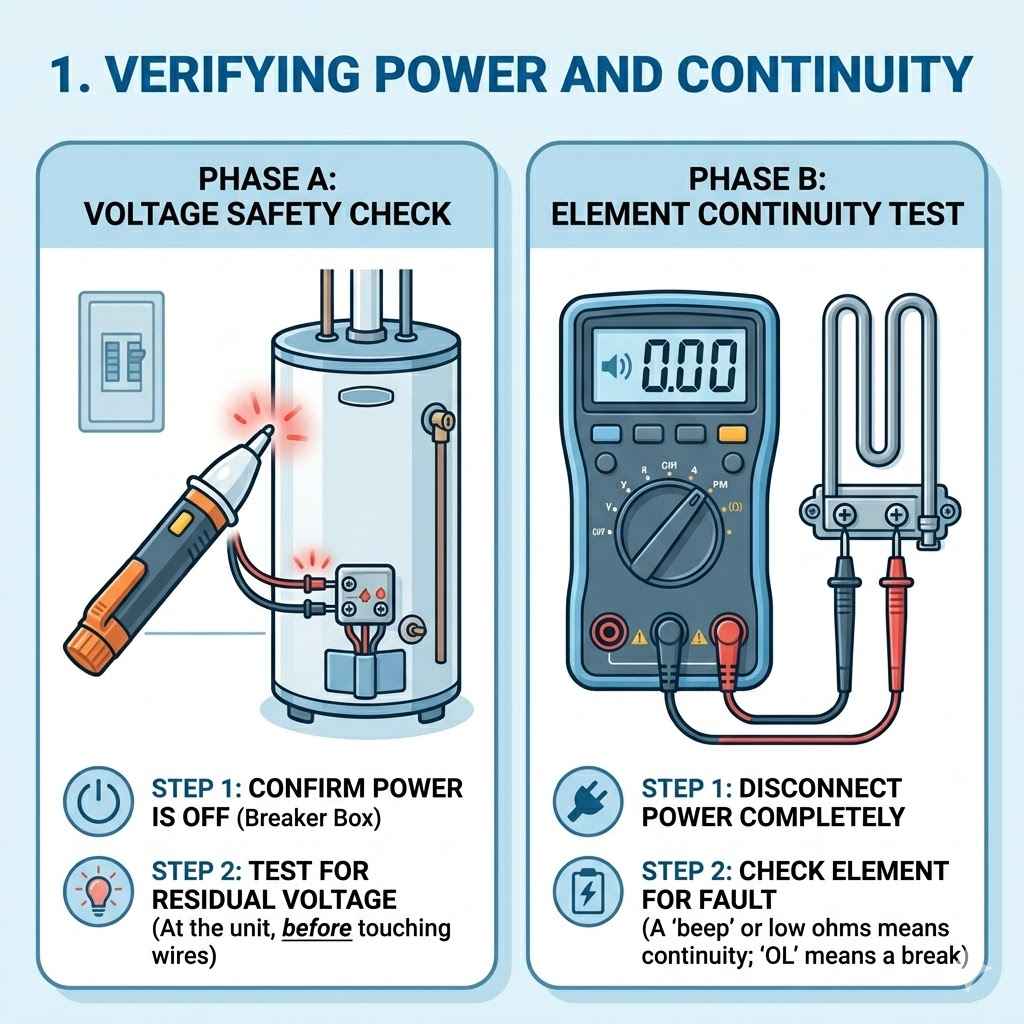
First, Safety: Grab your non-contact voltage tester. Go to your water heater’s electrical connection. Ensure the breaker for the water heater is ON at your main electrical panel. Test the wires going into the water heater. If the tester lights up, you have power coming to the unit. If not, the problem is likely with the breaker or wiring to the heater. You might need to check the breaker itself.
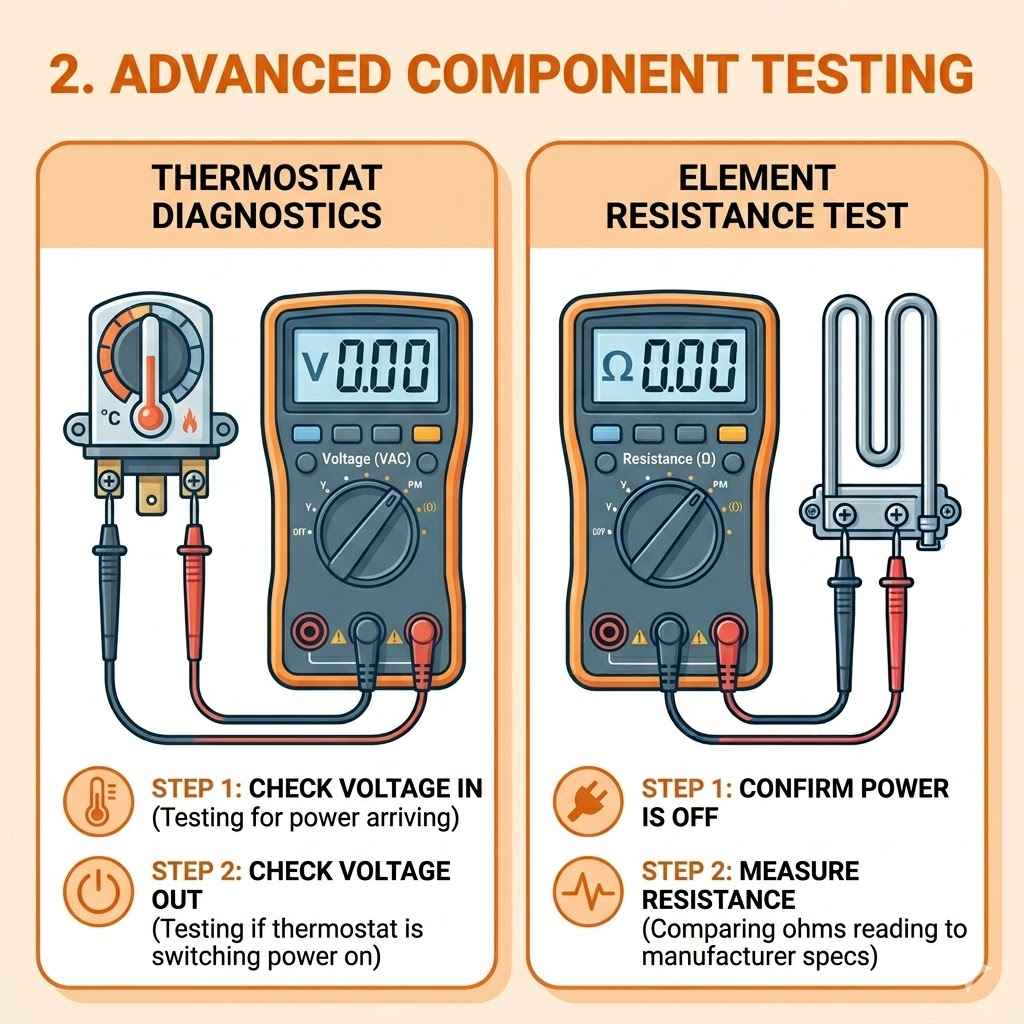
Using the Multimeter: If you have power at the heater, turn off the breaker for safety. Open the access panel to the upper thermostat and heating element. Carefully remove the insulation. Use your multimeter set to voltage. Turn the breaker back on. Test the voltage at the terminals of the upper thermostat. You should see around 240V. If you don’t, the problem is before the thermostat.
Testing the Element: If you have voltage at the thermostat, turn off the breaker again. Disconnect the wires from the upper heating element. Set your multimeter to resistance (ohms). Touch the probes to the two screw terminals of the heating element. A good element will show a resistance reading, usually between 10 and 30 ohms. If it reads OL (overload or infinite resistance), the element is bad. If it reads zero or very low, it might be shorted.
Quick Scan: No Hot Water Checklist
| Check 1: Breaker | Is the water heater breaker on? |
| Check 2: Power to Unit | Use a voltage tester. Is 240V reaching the heater? |
| Check 3: Upper Thermostat | Test voltage at thermostat terminals (breaker ON). |
| Check 4: Upper Element | Test resistance (breaker OFF). |
Scenario 2: Not Enough Hot Water
The water is warm, but not as hot as it should be. This often points to a problem with the lower heating element or thermostat.
Focus on the Bottom: The upper element heats the water first. Then the lower element heats the rest of the tank. If the lower element isn’t working, you’ll have hot water, but not a full tank of it.
Testing the Lower Element: You’ll follow a similar process as the upper element. Turn off the breaker. Open the access panel for the lower thermostat and element. Use your non-contact voltage tester to ensure power is off. Disconnect the wires from the lower heating element. Use your multimeter (set to resistance) to test the ohms on the lower element. Again, look for a reading between 10-30 ohms.
Checking the Lower Thermostat: If the lower element tests fine, you’ll need to check the lower thermostat. With the breaker ON, test the voltage at the terminals of the lower thermostat. You should see 240V. If you do, but the element isn’t heating, the thermostat might be faulty or not calling for heat.
Contrast: Normal vs. Concerning Readings
Myth: If there’s a little hot water, everything must be working fine.
Reality: If you’re consistently running out of hot water sooner than usual, it often means one heating element (usually the lower one) has failed. The upper element still works, but it can only heat a portion of the tank.
Myth: A heating element is either good or bad.
Reality: Elements can degrade. They might still have resistance but not heat efficiently, or they could develop internal shorts that trip the breaker.
Scenario 3: Water Heater Trips the Breaker
This is a more serious sign. It means something is drawing too much power or causing a short circuit.
The Clue is the Trip: A tripped breaker indicates an electrical fault. It’s your home’s protection system working. You need to find the cause.
Heating Element is a Common Culprit: The most frequent cause of a tripped breaker in an electric water heater is a faulty heating element. A heating element can develop a short circuit. This means electricity finds an unintended, easy path. This draws a dangerously high amount of current, tripping the breaker.
Testing for Shorts: Turn off the breaker. Remove the wires from one heating element at a time. Use your multimeter set to resistance. Test between the two screw terminals. A good element will show normal resistance. Now, test from each screw terminal to the metal body of the element. There should be no continuity (infinite resistance, or OL on your meter). If you find continuity here, the element is shorted to ground and is definitely bad. Repeat this for both elements.
Thermostat Issues: While less common, a faulty thermostat can also cause breaker trips. If a thermostat sticks in the “on” position or develops an internal short, it can overload the circuit. You can test thermostats for shorts similar to heating elements, checking for continuity between terminals that shouldn’t have it, or between terminals and the thermostat casing.
Stacked Micro-Sections: Breaker Tripping Steps
1. Safety First: Always turn OFF the breaker to the water heater.
2. Visual Inspection: Look for any obvious signs of burnt wires or damage.
3. Element Test: Use a multimeter to check resistance and for shorts to ground on both heating elements.
4. Thermostat Test: Check thermostats for internal shorts.
5. Wiring Check: Inspect all wire connections for looseness or damage.
Real-World Context: Where and Why These Issues Happen
Electric water heaters operate in a demanding environment. The constant heating and cooling cycles, combined with water exposure, can take a toll on components.
The Environment: Humidity and Heat
Water heaters are often in basements, garages, or utility closets. These areas can be humid. Humidity can contribute to corrosion over time. Metal parts, like heating element connections, can corrode. This corrosion can lead to poor connections and electrical resistance issues. The heat generated by the elements also adds stress. Materials expand and contract with temperature changes. This constant cycling can eventually lead to wear and tear.
Habits and Usage Patterns
How you use hot water matters. If your household has high hot water demand (e.g., large family, frequent baths), the elements will cycle more often. This means more wear. Letting the water heater run low on water repeatedly can also stress the elements. If an element is exposed to air while heating, it can burn out quickly. Always ensure there’s plenty of water in the tank before the elements are energized.
Design and Materials
Modern electric water heaters are built with safety and efficiency in mind. However, the materials used are subject to normal aging. Heating elements are typically made of metal alloys. Over years of service, these alloys can degrade or develop internal faults. Thermostats, with their moving parts and electrical contacts, can also wear out. The insulation around the wiring can become brittle and crack, exposing wires.
User Behavior
Ignoring early warning signs is a common user behavior that leads to bigger problems. If you notice the water isn’t as hot, or the recovery time is longer, it’s worth investigating. Waiting until there’s no hot water at all often means a more significant repair is needed. Also, attempting repairs without understanding basic electrical safety is a dangerous behavior. Always follow proper lockout/tagout procedures by turning off the breaker.
Observational Flow: Diagnosing a Cold Tank
Step 1: Notice no hot water.
Step 2: Confirm power to the house is on.
Step 3: Check the water heater breaker at the main panel.
Step 4: Use a non-contact voltage tester at the heater to confirm power is reaching it.
Step 5: If power is present, turn off the breaker to safely access internal components.
Step 6: Use a multimeter to test voltage at the upper thermostat.
Step 7: If voltage is present, test the upper heating element’s resistance.
Step 8: If upper element is good, repeat steps 6 & 7 for the lower thermostat and element.
What This Means for You: Normalcy and When to Worry
Understanding what’s typical and what’s a red flag is crucial.
When It’s Normal
Occasional Breaker Trip: If your breaker trips very rarely*, it could be a momentary surge. However, if it happens more than once, investigate immediately.
Slightly Longer Recovery Time: As water heaters age, they might take a bit longer to heat a full tank. This is often due to gradual element degradation.
Minor Temperature Fluctuations: Small changes in hot water temperature are usually normal. This can depend on the incoming cold water temperature and your usage.
When to Worry
Frequent Breaker Tripping: This is a clear sign of a serious electrical fault. Keep resetting the breaker.
No Hot Water at All: If both elements are confirmed to have power but aren’t heating, there’s a significant issue.
Leaking Water: Any water leaking from the tank itself or around the heating element seals is a serious problem. This could indicate tank failure or seal failure.
Strange Smells: Smells like burning plastic or electrical odors are immediate danger signs. Turn off the power and call a professional.
Noisy Operation: Loud popping, banging, or hissing sounds can indicate sediment buildup or other internal issues that need attention.
Simple Checks You Can Do
Before using your tools, perform these basic checks:
Check your main electrical panel to ensure the water heater breaker is in the “ON” position. Try flipping it completely OFF, then back ON.
Listen for any unusual sounds coming from the water heater.
Feel the pipes leading into and out of the water heater. One should be cooler (cold in) and one warmer (hot out), assuming it has been heating.
Your Troubleshooting Flowchart
Start Here: No Hot Water?
Is Breaker ON?
- Yes: Proceed to Power Test.
- No: Reset breaker. If it trips again, stop and call an electrician.
Is Power Reaching Heater? (Use Voltage Tester)
- Yes: Proceed to Element/Thermostat Test.
- No: Problem is with wiring or panel. Call an electrician.
Element/Thermostat Test (Use Multimeter)
- Good Readings: Problem might be with the high-limit switch or a complex wiring issue.
- Bad Readings (No Resistance/Shorted): Replace the faulty component (element or thermostat).
Quick Tips for Safe and Effective Troubleshooting
When you decide to test your electric water heater, safety is paramount.
ALWAYS Turn Off Power: This cannot be stressed enough. Before opening any access panel or touching any wires, turn OFF the circuit breaker for the water heater. Use your non-contact voltage tester to confirm power is off.
Read Your Meter: Familiarize yourself with how to use your multimeter. Practice on a known power source (like a simple lamp) to get comfortable with the settings and readings.
Understand What You’re Measuring: Know the difference between voltage, current, and resistance. Your water heater operates on 240V AC. Heating elements have a specific resistance range.
Consult Your Manual: Your water heater’s owner’s manual is a valuable resource. It may have specific troubleshooting tips or wiring diagrams for your model.
Don’t Guess: If your tests are inconclusive or you’re unsure about a reading, it’s best to stop and call a qualified professional. Electrical work can be dangerous.
Document Your Findings: If you’re testing multiple components, write down your readings. This can help you track down the issue and be helpful if you do need to call a pro.
Frequently Asked Questions About Water Heater Testing
Can I test my electric water heater with just a multimeter?
Yes, a multimeter is the most essential tool. It allows you to test voltage, resistance, and continuity, which are crucial for diagnosing heating elements and thermostats. However, a non-contact voltage tester is highly recommended for initial safety checks.
How do I know if my heating element is bad?
You test a heating element with a multimeter set to resistance (ohms). A good element will have a specific resistance, typically between 10 and 30 ohms. If it reads OL (overload/infinite resistance), it’s bad.
If it reads very low resistance (close to zero), it might be shorted. You also test for continuity between each terminal and the metal tank body; there should be none.
What should the voltage be at my water heater’s thermostat?
When the breaker is ON, you should measure approximately 240 volts AC at the terminals of the thermostat if power is reaching it correctly. If you don’t see this voltage, the issue is further upstream in the wiring or at the breaker.
Is it safe to test a water heater when the breaker is on?
Only when using specific tools like a non-contact voltage tester to confirm power presence from a safe distance. All other tests involving touching wires or components (like resistance or voltage readings directly on terminals) MUST be done with the power OFF at the breaker.
My water heater trips the breaker as soon as I turn it on. What should I do?
This is a classic sign of a short circuit. Turn the breaker OFF immediately. Use your multimeter to test both heating elements for shorts to ground.
Also, check thermostats for internal shorts. A shorted heating element is the most common cause.
Can I replace a heating element or thermostat myself?
Yes, many homeowners can
Conclusion and Final Thoughts
Troubleshooting an electric water heater can seem intimidating. But with the right instruments—a multimeter, a clamp meter, and a voltage tester—you can approach the problem methodically. Understanding how each tool works and what readings to expect empowers you. It helps you identify faulty heating elements or thermostats. Remember to always prioritize safety by turning off power before touching components. Knowing when to seek professional help is also key. With a little knowledge and the right tools, you can often resolve common water heater issues yourself.